Tesla Driver Profile: 25 Secret Settings
Save up to ten Driver Profiles on your Tesla vehicle so that each person can customize their EV driving experience. Automatically adjust seat and steering wheel positions using the Easy Entry feature. Rock your ride by choosing from Tesla’s lesser known driver preferences like navigation, stopping mode and fan position.
What is a Driver Profile?
Tesla vehicles will save each driver’s preferences so that every time the person enters their vehicle, the car automatically adjusts features to customize the driving experience. This is called the “Driver Profile”. Even if several drivers use the same vehicle, each can set their own profile to automatically adjust to their unique preferences when they are in the driver’s seat.
Most Tesla owners know about the Easy Entry setting, which adjusts the driver’s seat and steering wheel position. However, there are also more than 25 lesser known settings available to customize your Tesla driving experience, including:
- Side mirror positions
- Temperature
- Fan position
- Lights
- Navigation settings
- Display settings
- Door chimes
- Autopilot settings
- Steering mode
- Trip meter
- Stopping mode
“Tesla doesn’t list all the Tesla Driver Profile settings, but your EVehiclePro experts are in the know and spilling the tea!”
Tesla’s Easy Entry
Slide in and out of your vehicle effortlessly with Tesla’s Easy Entry feature! When linked to a Driver Profile, the steering wheel and seat pull back automatically to allow extra room for an easy entry or exit from the vehicle.
How Easy Entry Works
You can set up your Tesla so that when the vehicle is placed in “Park” and the driver’s seat belt is unbuckled, the steering yoke and driver’s seat automatically pull back to allow extra room.
When returning to the vehicle, the driver simply taps the brake pedal and the driver’s customized settings will automatically adjust to the preferences on the Driver’s Profile. Easy!
How to Set Up Tesla Easy Entry
When you first create your driver profile, check the box called “Easy Entry”. While in the Easy Entry setting, adjust your driver’s seat and steering wheel to a comfortable position. You will then be prompted to save the settings.
How to Reset Tesla Easy Entry
Ensure you are in the “Easy Entry” setting by clicking on the profile button on the top middle of the touchscreen.
Next, simply adjust the seat and steering wheel to your new preferred positions. The touchscreen will prompt you to “save” the new settings or “restore” your previous settings.
You can read more about Easy Entry here
Driver Profile Settings
Tesla frequently adds and removes Driver Profile options through software updates, so they don’t list all of the settings in their manual. However, the experts at EVehiclePro are in the know and are spilling the tea on all the current Tesla Driver Profile settings! We even tell you which ones are customized and which ones are universal.
Customized and Universal Driver Profile Settings
There are two types of settings in Tesla’s Driver Profile:
- Customized Settings. These preferences are unique to each driver’s profile. Changes to these settings will not affect other driver profiles.
- Universal Settings. These settings change universally and are applied to all drivers. When a universal setting is changed by one driver, it will affect all other driver profiles.
Check out the full list of Tesla Driver Profile settings that are currently available:
How to Set Up a Tesla Driver Profile
- At the top of the touchscreen, select the Driver Profile icon.
Then touch Driver Profile Settings > Add New Driver. - Enter the driver’s name and touch Create Profile. Follow the onscreen instructions to save mirror and steering wheel positions.
- Select the Use Easy Entry checkbox if you want to save (or use existing) Easy Entry settings in which the driver’s seat and the steering wheel are automatically adjusted to make it easy to enter and exit the vehicle.
How Do I Set a Primary Driver on Tesla?
To set up a primary driver, you need to tell your Tesla which bluetooth device is the priority. All bluetooth devices can also be linked to a driver profile so that the primary drivers setting will automatically adjust to the the drivers preferences.
To set the priority device on your Tesla, use the touchscreen:
- Select Controls > Software
- Select the bluetooth symbol at the top right corner
- Choose the device you wish to make a priority
- Turn on the Priority Device toggle
How to Set Up a Second Profile on My Tesla
Start by selecting the Driver Profile icon at the top of your touchscreen. Select Driver Settings>Add New Driver. Each vehicle supports up to ten driver profiles.
How to Change the Driver Profile Settings
If you change the position of the driver’s seat, steering wheel, or exterior side mirrors after you have saved or chosen a driver profile, the touchscreen will prompt you to either Save the new position or Restore the previously saved position. To change a setting without saving or restoring, just ignore the prompt.
Any adjustments to the other customized settings will automatically be saved to the drivers profile.
To make your drive pure perfection, check out the 25+ settings available to you by using the chart we’ve created above!
How to Manually Switch the Driver Profile
To switch a driver’s profile, touch the Driver Profile icon at the top of the Controls screen. Then simply select the desired driver. The vehicle will adjust settings that have been customized to that driver’s profile and a a green check mark appears next to the driver profile icon on the touchscreen.
This is a great feature for long road trips that have two or more drivers.
Linking Driver Profiles to a Key
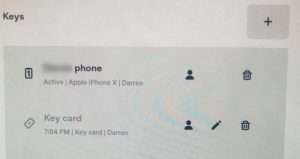
You can link a Driver Profile directly to a key (or keys) to allow the vehicle to automatically select the correct Driver Profile when the linked key is detected, as you approach the vehicle and open the driver’s door.
All vehicles support up to 10 driver profiles. You can link multiple keys to a single Driver Profile. However, only one Driver Profile can be linked to any key.
How to Link a Driver Profile to a Key
To link a driver profile to a key:
- Ensure the key is activated and working.
- Touch the Driver Profile icon at the top of the touchscreen and choose the profile you wish to link to the key
- Click on the car icon at the bottom left of the touchscreen > Locks
- Next to the key you wish to link to: Click the icon shaped like a person. This will link the current profile with this key.

What’s the Best Seat Position for Driving a Tesla?
You’ve been driving cars for years, but do you know the best way to optimize your ergonomic comfort and avoid injuries? The experts at EVehiclePro want to help you to drive comfortably and safely by finding the best seat position for you.
How to Set Ergonomically-Friendly Seat and Steering Wheel Positions
Physiotherapists suggest starting in Easy Entry mode, where the seat is in its lowest and furthest positions, and the steering wheel is furthest away from the body.
Follow these steps to properly adjust your seat and steering wheel:
- Shift the vehicle into Park and sit in the driver’s seat with Easy Entry selected
- Recline the back of the seat to a 30-40 degree angle
- Move the steering wheel all the way up and in toward the dashboard
- Raise the seat so that your hips are at least as high as your knees and the seat position is as high as possible to maximize your vision of the road. Make sure you can easily see the road and touchscreen without bending your head or neck
- Move the seat forward so that you can touch the pedals without moving your back away from the seat
- Raise the incline of the seat back to 100-110 degrees (to reduce lower back pressure)
- Now adjust the steering wheel position so that your shoulders are pressed into the seat, your elbows are straight and your wrist is able to bend over the top of the wheel while in the “10 and 2 o’clock” position
- Check that you can still see the touchscreen and through the windshield and that your legs are clear of the wheel when you use the pedals.
Save your customized settings to your Driver Profile (Easy Entry)
Setting the Lumbar Support
The driver’s seat has lumbar support. Here’s how to adjust it:
- Start with the lumbar support in flat or “backed off” position
- Adjust (increase) the lumbar support button (located with other seat adjustment buttons) to fit the curve of your lower back. You should feel even pressure along your spine, with no gaps.
Unfortunately for passengers, Tesla has removed the lumber support cushion features in the passenger seat of their vehicles. So, if your passenger needs extra back support or travels for long periods of time, add a lumbar cushion such as this one.

Are Tesla Headrests Adjustable?
Tesla headrests are only adjustable (vertically) on Models X and 3.
How to Adjust the Headrest on Model X
- Tap the button on the lower part of the seat
- Select “Headrest” on the touchscreen then use the manual button on the seat to adjust up or down.
How to Adjust the Headrest on Model 3
Model 3 requires the headrest clip to be removed before adjusting the headrest up or down.
Model Y
Tesla does not allow for headrest adjustments on the Model Y.
If the headrest position is uncomfortable or you want more support, choose a neck support cushion to support you while driving. This headrest cushion fits all models and matches Tesla’s black or white interior.

Hint: Physiotherapists recommend that the top of the head rest is level with the top of your head. In the event of an accident, this will minimize whiplash injury.
FAQ
How do you adjust the seat on a Tesla?
Simply sit in the driver’s seat and shift the vehicle into Park. Adjust the seat to a comfortable position using the controls at the left lower portion of the seat (up and down, back and forth and lumbar support). Save your customized settings to your Driver Profile (Easy Entry).
How do you save the seat position on a Tesla?
Once you’ve found the perfect position for the driver’s seat, save it!
After making adjustments, the touchscreen will prompt the driver to Save the new position or Restore it to the previously stored position. The save button will only appear for few seconds after adjusting the seat.
How many driver profiles can a Tesla have?
Each Tesla vehicle supports up to ten driver profiles.
How can Tesla recognize the driver?
When a smartphone or key fob is linked to a driver profile, the vehicle will automatically assume the driver is the one with the key that unlocks the Tesla, and will adjust the settings to match that driver.
Do Tesla seats have lumbar support?
Drivers can still manually adjust the lumber support on their seats, however Tesla has removed the lumber support cushion feature in the passenger seat of their vehicles. If passengers need extra back support or ride for extended periods of time, add a lumbar cushion such as this one.
What can I do if the Driver Profile doesn’t work?
Occasionally, the Tesla vehicle will detect the passenger’s key first and adjust to their settings. Simply touch the profile button at the top center of the touchscreen and choose the correct profile.
Will my Driver Profile work on a different Tesla that I borrow or rent?
Tesla is currently developing a feature that will use the Cloud to enable drivers to maintain their preferred settings – no matter what Tesla they drive. This feature is known as “Vehicle Sync” and is a highly anticipated update.
What is Tesla Vehicle Sync?
Tesla’s “Cloud Profiles” is a feature under development that will allow drivers to store their customized profiles to the Cloud. Enabling “Vehicle Sync” from the Cloud Profiles would automatically adjust other Tesla vehicles to the driver’s preferred settings.
So whether you drive multiple Teslas in your household, loan or rent, your favorite “Stopping Mode”, vent settings and seat preferences will be waiting for you.
Thinking about a Tesla EV? The EVehiclePro team has got your back with loads of expert advice and honest reviews for new and seasoned Tesla drivers. Join the Tesla Connect community on social media and sign up for our newsletter with helpful tips and exclusive coupon codes for great savings!


